Sweet Sandy B. Bakes

If we are ever to enjoy life, now is the time. Not tomorrow or next year... Today should always be our most wonderful day...

So, let's eat cake!

Notes on my adventure as a mom and baker and life as Sweet Sandy B...

Wednesday, November 9, 2011

Kicking Monday's a**- or Buttermilk Cherry Scones

I realize it's Wednesday, BUT I did these on Monday, the day I kicked ass.
Can't begin to tell you all I did, it would be easier to tell you what I DIDN'T do. It was one of those days.

So, after dropping off #1 at pre-school, grocery shopping and taking Moochie to get her bangs trimmed, I settled into these:


I always thought scones were these awful dense bricks that lacked much flavor and were only a vehicle for jam or butter....
Until I came upon this recipe. Here is what you will need:

Pastry Flour, Bread Flour, baking powder, vanilla, eggs, salt, sugar, butter, buttermilk and cherries

I will talk about modifications you can make at the end along w/ the recipe.
First- lets talk about some important steps
1) SIFT ALL YOUR DRY INGREDIENTS!!!!

You need a fine sifter- or a "chinois". set it right on top of your mixing bowl and then just dump your dry ingredients in the sifter and push through into the bowl. NOTE- ideally, if you ever have flour, baking soda/powder/salt, etc, you should sift them together. Trust me, it will make your final product MUCH better

Then you add the COLD CUBED butter. COLD. not slightly warm, not room temp. Pretty much the exact opposite of the butter consistency from the chocolate cake recipe.

break up the pieces and drop them in the mixer w/ the dry ingredients. Mix until you get small "pebbles"
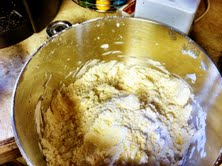
This works better when the butter is COLD. and you might want to dig down with your spatula (aka your hands) to make sure the butter worked its way down to the bottom too.
Now we add the wet ingredients:

I combine all the wet ingredients in a bowl, then dump them all in at once into the mixing bowl... more on this at the end.
Here is another warning. DO NOT OVERMIX. repeat after me- DO NOT OVERMIX. overmixing = tough dough = dense brick like scone.
SO- you want to almost pulse the mixer. pour the wet in, turn on the mixer. turn it off. turn it on, turn it off. you just want it to BARELY combine:

now you can add the dried cherries

after you pulse the mixer again, you can see if you need more cherries. play it by ear

Now, have a floured work surface ready for the dough because ideally your dough will be wet and sticky

Drop the dough on the flour and then form it into any shape your heart desires but make sure its about 1/2 inch- 1 inch thick. Depends on how big you want your scone. Then get a cookie cutter/biscuit cutter or a knife to cut the dough into the shape you find most pleasing. I used a biscuit cutter because I fancy the handle- it makes it easy to punch it out and it was the first thing I found. :)
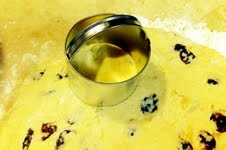

**Keep a little pile of flour on the side of your work surface to dip your cookie cutter/biscuit cutter in between cuts. Bc the dough is so wet, it will help the process.

Alright- if you are a planning type person and have room in your freezer- you can stamp these out, put them in a freezer safe container and freeze these puppies to use as needed- 1 or 2 at a time, etc. then you can appear to be a suzy homemaker any day of the week, or if you have an unexpected visitor and you want to impress them like you are the worlds best Mom, (or Dad) or friend. whatever.

**also, you should ideally punch these out as quick as you can bc you want the butter to stay COLD. If you have hot hands- touch the dough as little as possible. You do NOT WANT TO MELT THE BUTTER.

So, punch these out. if you have time, refrigerate them to make sure the BUTTER IS COLD. If not, put them on a baking sheet that is lined w/ a Silpat OR Parchment Paper:

Now you need to egg wash these (do you have a pastry brush? get one) and then sprinkle sugar on top. Employ child labor as needed
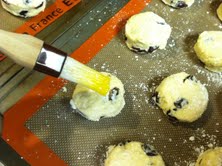
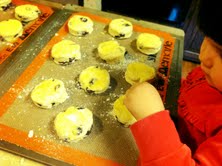

The egg wash in this case was just a whisked together egg w/ a pinch of salt and a tiny bit of water. What does an egg wash do? well, it adds a golden 'sheen' and kind of seals the top. The sugar adds a nice crunch because it will slightly caramelize (aka melt) and add MORE of a golden color. Just do it, trust me.

Throw these in a 425 oven for about 20 minutes.. you will know they are done when they turn that golden brown color AND they have raised and puffed up:


These are NOT meant to be super sweet. They are a breakfast pastry and also delightful with tea, if you are that kind of person.
Moochie and #1 dig these with extra butter in the middle.

Some notes:
-You can add ANYTHING to this basic recipe. If you want raisins or any other dried or FRESH fruit, by all means- swap them out for the cherries. If you aren't a fruit fan, leave them all out and you can add nuts or any sort of chip- chocolate, peanut butter- butterscotch... But if you are a purist, leave these plain and serve them with butter and jam.
-Also, make sure you use an appropriate sized mixing bowl/mixer. I made this recipe in my KitchenAid Artisan- which is I believe a 3 or 4 qt. mixer. My dough really really wanted to escape the bowl. I should have used my KitchenAid Professional (which is STILL IN THE BOX, four months later....) because it has a 5 QT bowl. Or, I could have cut the recipe in half. So, if you are making this recipe and plan to eat them same day, I would cut the provided recipe in HALF.
-Shapes- a traditional scone is either a circle OR a long triangle- like a wedge/slice of pie. People might recognize and know what it is if you present it in that traditional shape.
-Butter- the higher quality butter you can find/use/afford- the better. AND, we want the butter cold because when butter melts, it evaporates water. We want this to happen- but while its in the oven because that's what helps create those pretty layers I tried to show you in that final picture. Which is also the same thought process when you are making croissants. You want those air pockets :) unless you want a brick of a scone

I'll shut up now and HERE is the recipe: (I hope you have a kitchen scale- or can Google a conversion chart)
-12 oz bread flour (approx 1 and 1/2 cup)
-12 oz Pastry flour (most grocery stores now have multiple kinds of flour and if you cant find pastry flour, use cake flour)
-3 oz sugar plus more for sprinkling at the end
-.25 oz salt
-1.5 oz baking powder
-1/2 lb of cold cubed butter (two sticks of butter)
-5 oz eggs (about 2 1/2 eggs- so... crack open THREE eggs, add two to the other liquids and scramble the 3rd and save 1/2 of that third egg for your egg wash)
-13 oz buttermilk (or whole milk, depends on what flavor you want)
-1 tblsp. vanilla
-1 1/2 cups cherries

bake at 425 for 15-20 minutes.. MAY take longer depending on your oven.

Monday, October 24, 2011

Owls, official animal of hipsters worldwide

So owls are cliche anymore. I don't really care- I love them and they are my favorite. Like cuddling.
I've been wanting to make owl cupcakes for oh... about 2 years now. and today is my sweet baby girls 3rd birthday and since she has been celebrating this glorious event since last weekend she has had every sort of birthday treat imaginable. I had to do something different and BETTER for her to take to her nursery school class.

Therefore, I'm bringing the big guns. Mini owl cupcakes. Because they are smaller, just like my Moochie, they are automatically cuter. Thus, they will trump everything done thus far. Even the stupid cake Mr. Papers had someone else make for her birthday party yesterday.... hmph...

I was short on time so this is quite possibly the easiest treat to date (except maybe the Dump Cake). Check it:


One box cake mix. Whatever flavor floats your boat- and all the necessary ingredients to make said cake.
One tub of frosting- or two if you want to do two different flavors/colors
Mini Oreo cookies
Candy Corn, Mini Chocolate Chips, M & M's, orange candy gummies***** we will talk about the candies at the end****

First you will need to bake mini cupcakes w/ said box cake mix. Follow directions on the box, cool. If you want to be a perfectionist you can bake a cake from scratch (like my delightful chocolate cake) and you can use brown cupcake liners.
I baked cupcakes last weekend and had a ton left over, so I froze them, thawed them and used them today. So sue me. They are also in mismatched cupcake liners- not at all halloween or fall themed. Again, I suck at life.

So, if you baked from scratch or GASP used the box mix, let those babies cool while you


Mini oreos by nature are not as 'clean' as full size oreos. so they are a bit more 'dusty' on the creme filling. But, 3 year olds are eating these. They could give a rats behind. I'm in a HURRY here and working with what I have. You want to break them in half so the cream is on one side and then the "clean" side you will want to slice in half because these will be used later for further face decorating... See:

You frost the cupcake, then add the eyeballs, then the pupils (mini chocolate chips), then the beak- which can be either an orange M &M or a candy corn, then add the 1/2'd oreo as eyebrows/ears/feathers. Not sure what they are, but they are cute.


Here are a few variations:


Moochie's favorite colors are pink and purple (and lately orange) so, I made some pink owls as well. This is where I got slightly fancy


Pink frosting, pink heart sprinkles, oreo eyeballs, mini chocolate chip pupils, yellow m&m beaks

Super fancy, no?
Here they are in all their IN YOUR FACE glory ready to be half eaten by unimpressed 3 year olds


**Notes on the candy... The candy corn, I felt, was too big for a beak. And someone commented that they made them look like muppets, not really owls. And I obviously didn't use a single orange gummy thing. Because I would have had to manipulate the candy- i.e. cut it into the right shape, possibly use a rolling pin, etc etc. I was short on time. The M&M's worked best, looked the cutest (in my opinion) and kids all love M &M's. But I did have to sort through a bag of the candy to get only yellow and orange. SO, you could just buy reese's pieces and save yourself even more time.

Saturday, October 22, 2011

Chocolate cake. better than a handshake, not as good as .. you know

Full disclosure- I'm not usually a chocolate cake fan. Hands down I go for 'yellow' cake with milk chocolate frosting. Nothing fancy, I want something that reminds me of being 6 and the pure joy of eating cake my mom made.

But, we are changing the dessert menu at work and I knew we needed some ridiculous chocolate to make the cut. SO I started playing around with a chocolate cake, because girls LOVE chocolate.
I put a variation of this cake up on special last week and guess who came in and had a slice? Chris Tucker ;) He loved it so much he asked me out for a drink after. that's another story!

SO-
Here is what you need for the cake:


This is a very straight forward cake, but there are few things you MUST do to get the cake right.
First, put all the dry ingredients into a bowl- flour, sugar, cocoa powder, salt, baking powder and baking soda


mix them together to combine
then, add the vanilla and the SOFTENED butter. NOT melted. not cold. soft, room temp butter. It should look like this:

turn on the mixer and while it is coming together, you HAVE to do this:

Butter and coat two 8 or 9 inch cake pans with COCOA powder. because we are making chocolate cake- you don't want a coating of white flour on the outside of the rich brown cake. it will look gray and gross. We are frosting them anyhow- but trust me.
Now we add the liquids- 2 eggs and some water. Mix for THREE MINUTES. set a timer. THREE minutes. You want the batter to look like this:

It is thick, but you do not want to overmix. This will make the cake way too dense/tough and it won't rise nice and fluffy. You want fluffy and airy.


Pour evenly between the two pans and put in a 350 degree oven for 35-40 minutes (this depends on what size pan you use. Smaller pan = longer bake time. Unless you make cupcakes. duh.

Now. The frosting. This frosting is the one that tastes and comes closest to your favorite Betty Crocker chocolate frosting from the tub. It is f'ing awesome. Here is what you need:


mix the regular sugar and cocoa powder in a pot. then add everything else BESIDES the powdered sugar and vanilla

mix with a spatula and try to smooth out the lumps while you turn the heat up on the stove top because you want to bring all of this goodness to a boil for about THREE minutes. stir continuously. you do NOT want to scorch the cocoa.


after three minutes- take off the burner and put anywhere else to cool for THIRTY minutes, at least. if you can and have room- go ahead and put it in the fridge. you can do this if you are in a hurry too.

this will coincide nicely with the timer going off indicating your cakes should be done. you know how to tell if a cake is done, right? ok good. well mine wasn't done after 35 minutes. so, i let them go for about 5 more minutes but I kept checking because this cake goes from not done to crispy in as little as 2 minutes.
you want it to look like this:


let them cool in the pans for TEN minutes. set a timer. TEN minutes. they need to cool a bit in the pan or they won't come away cleanly. BUT, if you leave them in too long, they will overcook and dry out. both things are bad. so SET.A.TIMER
and in the mean time you can keep futzing with the frosting mix because you want it to cool enough to look like this:

you want to be able to divide it like the red sea and see the bottom of the pot. you should be able to touch the bottom of the pan and it be cool.

alright turn the cakes out on a wire cooling rack and let them cool for at least an hour.

now pour the frosting mix into the mixer and start whipping it up. we want to incorporate as much air as possible so it will get light and fluffy. while the whisk is going, you can start pouring in the powdered sugar and the vanilla. and keep whipping! you want it to get thicker from the powdered sugar, but still whip up enough to frost the cake so it doesn't look like just a ganache.

see how the whisk is leaving marks in the frosting? it's getting thick enough!

so- i had some time left for the cake to cool and i started chatting on the phone and after an hour I was like- ooooops gotta torte and frost the cake. So I forgot to take pictures of that step but basically, I cut each layer in half and put frosting in between each layer. Then frosted the outside and it looks like this:


and then because I need the "triple" in the "triple chocolate" I added chocolate chips on top. you can add anything at this point- white chocolate shavings, or shavings from any candy bar, chocolate sprinkles- whatever makes your heart happy.


ta da! and now put it in the fridge and let it set up. and then the next morning wake up and give it to a friend, like me :)
FYI- i didn't eat ANY of this cake while baking, decorating or even after it was set up. I was fasting for a blood test.
talk about torture.
it might have been more torturous for my friend that was watching me decorate it and couldn't eat it either. zing!

So, if you are inclined- here is the recipe:
Chocolate Cake
2 1/4 c all purpose flour
1 2/3 c sugar
3/4 c softened butter
2/3 c cocoa powder
1 1/4 c water
1/4 tsp baking soda
1 tsp salt
1 tsp vanilla
1/4 tsp baking powder
2 eggs

Chocolate Frosting
1 c sucrose
1/2 cocoa powder
1/2 c WHOLE milk (or heavy cream or half and half)
4 tbsp. butter
2 tbsp. corn syrup
pinch of salt
1 1/2 c powdered sugar
1 tsp vanilla

Take aways- the timer is your friend w/ this cake. USE IT.
also, this cake tastes amazing with a raspberry sauce, or just a tall glass of milk.

Monday, October 3, 2011

It's officially fall...

I love fall. Hands down, favorite season. First off because it brings the month of October. the best month of the year and not just because my birthday is in October (oh, on Thursday- did I mention that?).
Um, college football and HALLOWEEN are in October. yessssss

Also you can finally put on sweaters w/ jeans and sneakers and hide your belly again (thank you baby jesus), AND you can make delicious stick to your bones fall food.

like chili and cornbread.

So. way back in February an acquaintance- now friend :)- mentioned something about making bomb chili. I asked for the recipe and received an email with directions. It took 8 months, but I finally did it justice. It took some visual inspiration though, I saw what it looked like in their kitchen first today and Moochie & #1 were like, can we make chili too? You bet your ass we can. We went to the grocery store to get....


(ground meat, various beans, tomato sauce, tomato paste, celery, onion, jalapeno, tomato, green pepper, green chili, white pepper (?), cumin, regular pepper, chili powder) and FYI, you really do need a big ass pot. This exact term was used in the directions. This is no lie. biggest pot you have. use it.

*please note- I altered the recipe I received just slightly. Mainly, I did this:

Instead of using 2 lbs of ground beef, I used one pound of ground veal and one pound of ground sirloin. i'm fancy.

and the recipe also called for Frostbite. Back in February I was like- really? c'mon. do you REALLY use this? but today, I saw first hand that yes, indeed Frostbite is used.
I do not have Frostbite. Nor does my local grocery store. But you know what I do have? Sriracha. If you don't already have some, GO BUY IT NOW.

I had to get my mise ready so I chop chop chopped away while the kids waited not so patiently (we were going on a halloween treasure hunt around the block. i know, i told you I was fancy). And then we did some pop'ing and dropping. i.e. i opened what felt like 100 cans and let the kids dump them in the big ass pot.

Recipe called for 2 cans pinto and 2 cans kidney beans. I went off recipe and used 1 of each: pinto, black, cannelini, kidney. and then we put everything else in the pot except for:


meat, onions and green pepper
i let the onions get translucent and the meat cooked about half way. because then we just dumped THAT into the b.a.p. too.
and then we let it simmer away for about an hour while we went on our treasure hunt.
....
we come home and the house smells amazing. the kids aren't impressed and they want corn dogs instead. and butter noodles. shocking.
i sway them only slightly by telling them we are going to make fancy cupcakes. little did they know....

these ingredients would be making cornbread muffins. i'm mean, i know.
so we have cornmeal, bread flour, eggs, whipping cream, salt, baking powder, sugar, shortening and a can of sweet summer corn which I forgot to include. i was hiding it from the kids.
pretty much you just cream the shortening, then add liquids, then dry ingredients and last corn or whatever at the end (i envision bacon as a stellar addition) My friend said that vanilla is a good thing to add. huh.. never would have thought. and I love vanilla. maybe next time...
so, the mix is lumpy. i just plopped it in the muffin cups after letting the kids go nuts w/ the Pam.

15 minutes in the oven at 450.

kids are eating their corndogs and i'm salivating over the chili.
no lie as soon as the timer went off I served myself a bowl so it could cool down and waited TEN torturous minutes while the muffins cooled so I could turn them out w/o breaking them.
i even put Plugra butter on them. i know, i'm disgusting. it was worth it

Here is the recipe...

1 med. onion - diced
1 large green pepper - diced
1 jalapeno pepper - diced - keep seeds in
1/2 cup green chiles - diced (1/2 cup = 4 oz, which is exactly how a can is sold. woot!)
1/4 cup diced celery
2lbs ground beef (any ground meat would do I suppose. I was looking for lean, so you know veal and sirloin worked)
2 med. tomatoes, chopped (I suppose you could use a can here too)
2 29oz cans of tomato sauce
2 15 oz cans kidney beans
2 15 oz cans pinto beans
1 12 oz can tomato paste
4 tablespoons chili powder (I use http://www.penzeys.com/cgi-bin/penzeys/p-penzeyschilihot.html)
8-10 drops of Frostbite (http://cajohns.com/vmchk/Hot-Sauces/Frostbite-White-Hot-Sauce.html) *i used sriracha instead
2 teaspoons cumin powder
2 teaspoons black pepper
1 teaspoon white pepper (I just used more black pepper)
1 tablespoon salt
2 cups water

1. brown beef - crumble to pea-sized pieces
2. add diced onions and green pepper to beef while cooking
3. mix all other ingredients in big ass pot.
4. drain beef/onion/pepper and combine into pot.
5. simmer for 3 hours - stirring frequently.

i biffed on the stirring frequently as I left the house for an hour. oops... but i stirred even more frequently upon my arrival. whatever, it was fine. :)

Monday, December 6, 2010

My adventures in staging, Day 1

I have to explain what staging is. Pronounced "stah-ghing" it is when a cook or chef works briefly, for free, in another chef's kitchen to learn and be exposed to new techniques and cuisines (thank you Wikipidea).

A stage normally is used to see how a new chef/cook/student can adapt to the kitchen environment they are placed in. When a chef/cook/student is seeking an internship or job, often the stage is the next step after the interview. It can be a one day affair, take the place of a 'job' and become an internship, or it can be like a once-a-week type thing. It is pretty much a French way of saying "job shadow".

Staging is a mandatory part of my curriculum at school. I thought it was brilliant, and in fact I tried to do this while still in Michigan before I started school, but being that not many people had heard of this term, they were like- dude, no way. I had an arsenal of retorts- primarily that it was free labor.
SO you can imagine my elation that so many places in Chicago welcome stages with open arms and in fact contact the school seeking out students to come in. Why? I'd like to think it's only because of our stellar reputation. But lets be honest. It's because they have long ago realized IT'S FREE LABOR. and, a great way to interview students before you actually need to hire someone. It's kind of like scouting.

I did quite a bit of staging. So, I'm going to just highlight a few of my experiences- mostly the ones that had the most impact on me. Lets start with my very first one because to me, it is the best story....

Alright. Because I was truly a go-getter upon my arrival here, I started to search for stages before I even moved here. seriously. I had a list of bakeries I wanted to visit and introduce myself. I was that irritating girl in class that was smugly making appointments with different head pastry chefs during breaks. so... yeah, I signed up for my first stage at a bake/cake shop in a trendy neighborhood in Chicago- let's just call it "hipster central". My hope was that I could get in the cake design area and make a job out of it while living in here. Lets just say, it didn't go that way.

I hightail it there a week later literally as soon as I get out of my first full day in the kitchen at school (as in my first time in uniform using my chefs knife in the classroom kitchen). It was BLAZING hot and humid. Up to this point, I had only been in one bakery kitchen and that was back in Michigan. I knew this would be different, but wow was I NOT prepared for HOW different.

Upon my arrival, I quickly changed into my uniform and began to sweat like a farm animal within minutes. Being in a full production kitchen that has been baking cake, pastry, bread ALL DAY will never be a comfortable- temperature wise. I timidly ask to speak to the chef that was in charge of me for the day. Here he comes in full Chef uniform and hat, introduces himself and says ok- why don't you get started on this white chocolate ganache. He hands me a recipe that is written in grams. ok... I knew that I would be working w/ grams instead of cups/spoons so it wasn't that odd. however, I had NEVER used a kitchen scale until that morning in class. It's ok, I'll wing it. No big deal. I start to look around to try and get my bearings. I notice that the majority of the women are speaking Spanish, so I wasn't sure what to do. I can speak Spanish well enough, but not really versed in cooking/baking terminology in Spanish. "excuse me? Perdon? puedes ayudarme encontrar el chocolate? Chocolate blanco? Please? Por favor?" This woman looks at me and points to the general direction of bins of different chocolate. Open your eyes idiot... Sheepishly I smile and start looking for bowls/containers/etc to get my mise en place ready. I move from one area to the next, trying to gather what ingredients I could find 'quickly' (quickly being completely relative) and re-read the recipe for the 100th time.

Mr. Chef has been watching me out of the corner of his eye and then comes over and looks me up an down. He says, "ok Sandra (i was a dork wearing my school name tag) why don't you first start by blooming the gelatin, then worry about the chocolate and other ingredients". I stared at him w/ saucers for eyes and said "sure..ok, great idea". He stared right back at me and said "Have you ever bloomed gelatin before?" I continue to stare blankly at him and begin racking my brain. obviously, the 'racking' was going to do me no good because I had never done it before. BUT- had I heard of this term before?? hm... bloom gelatin... bloom gelatin.. all I kept thinking about was making freaking Jell-O but that wasn't what we were talking about here. This was for a white chocolate ganache. WTH?
So, I say no- but I can figure it out! At this point he realized what he had on his hands. Someone w/ ZERO kitchen experience. He quickly pulled an established intern away from what they were doing and said- "Sandra, this is _______. He will be helping you today."

I was determined to make up for my lack of knowledge by being the best direction follower ever and not leaving until everyone else left. Truthfully, I don't remember much else of what I did that day. I obviously made the ganache (oh, and almost burned ALL of the white chocolate), I dipped some eclairs in chocolate... helped scale some pistachio something or other... cut chocolate 'biscuit' for some petit four, and after 9pm, changed and got on the train to my apartment. I was exhausted and sweaty, and was like- sweet baby Jesus can I actually do this? Did I make the biggest mistake of my life?? As this fear creeped in, my eyes filled with the tears I had been holding back all afternoon and I stared out the window of the train and watched the city speed by.

Thankfully- it gets better. But that's for another night. And, yes. Now I know how to bloom gelatin. ;)